How to Compress Images Without Visibly Losing Quality
Most oversized images are not a compression problem at all. They are too many pixels saved in the wrong format. This guide explains what compression does to a file, the order of operations that gets the biggest savings, and how to find the lowest setting that still looks clean.
Why file size matters
- Web pages. Images are usually the heaviest part of a page. Smaller files load faster, especially on mobile data, and page speed feeds into how search engines rate a site.
- Upload and attachment limits. Email providers, job portals, forms and marketplaces cap file sizes. A photo straight off a modern phone can exceed them.
- Storage and sharing. A folder of right-sized images is faster to back up, sync and send.
What compression actually does
JPEG: simplifying 8×8 blocks
A JPEG encoder first separates brightness from color and usually stores color at reduced resolution, because the eye is far more sensitive to brightness detail. It then cuts the image into 8×8 pixel blocks and rewrites each block as a mix of simple wave patterns, from smooth to fine. Quantization is the lossy step: the encoder rounds the fine patterns coarsely, often to zero, since they carry detail you are least likely to notice. The quality setting controls how coarse that rounding is. Push it too far and the block grid shows through as blockiness in skies, and sharp edges pick up ringing “mosquito noise.”
WebP: smarter prediction
Lossy WebP predicts each block from its already-decoded neighbors and only stores the difference, then quantizes that. It also includes a filter that smooths block boundaries. The result is usually a smaller file than JPEG at similar visual quality, and when it fails it tends to look soft rather than blocky. WebP also has a separate lossless mode.
PNG: lossless, with a palette option
PNG never discards anything. It predicts each pixel from its neighbors and compresses the remainder with the same algorithm ZIP uses. That works brilliantly on flat colors and poorly on photos, where sensor noise makes every pixel slightly unpredictable. Tools that make tiny PNGs usually reduce the image to a palette of 256 colors or fewer (“PNG-8”) before compressing, which is itself a lossy step. Photoyam exports full-color PNG and does not offer palette reduction, so for small photo files use JPEG or WebP instead.
Resize first: pixels dominate file size
File size scales roughly with the number of pixels, and pixel count grows with the square of the dimensions. Halve the width and height of a 4,000 × 3,000 photo and you keep 2,000 × 1,500, only a quarter of the pixels. No quality slider can find savings that large without visible damage.
So start by asking how big the image will actually be displayed. A blog column might be 800 pixels wide; a full-width hero image rarely needs more than about 2,000 pixels, which already covers high-density screens at typical widths. Anything beyond the display size is downloaded and then thrown away by the browser. See our social media image sizes guide for common targets.
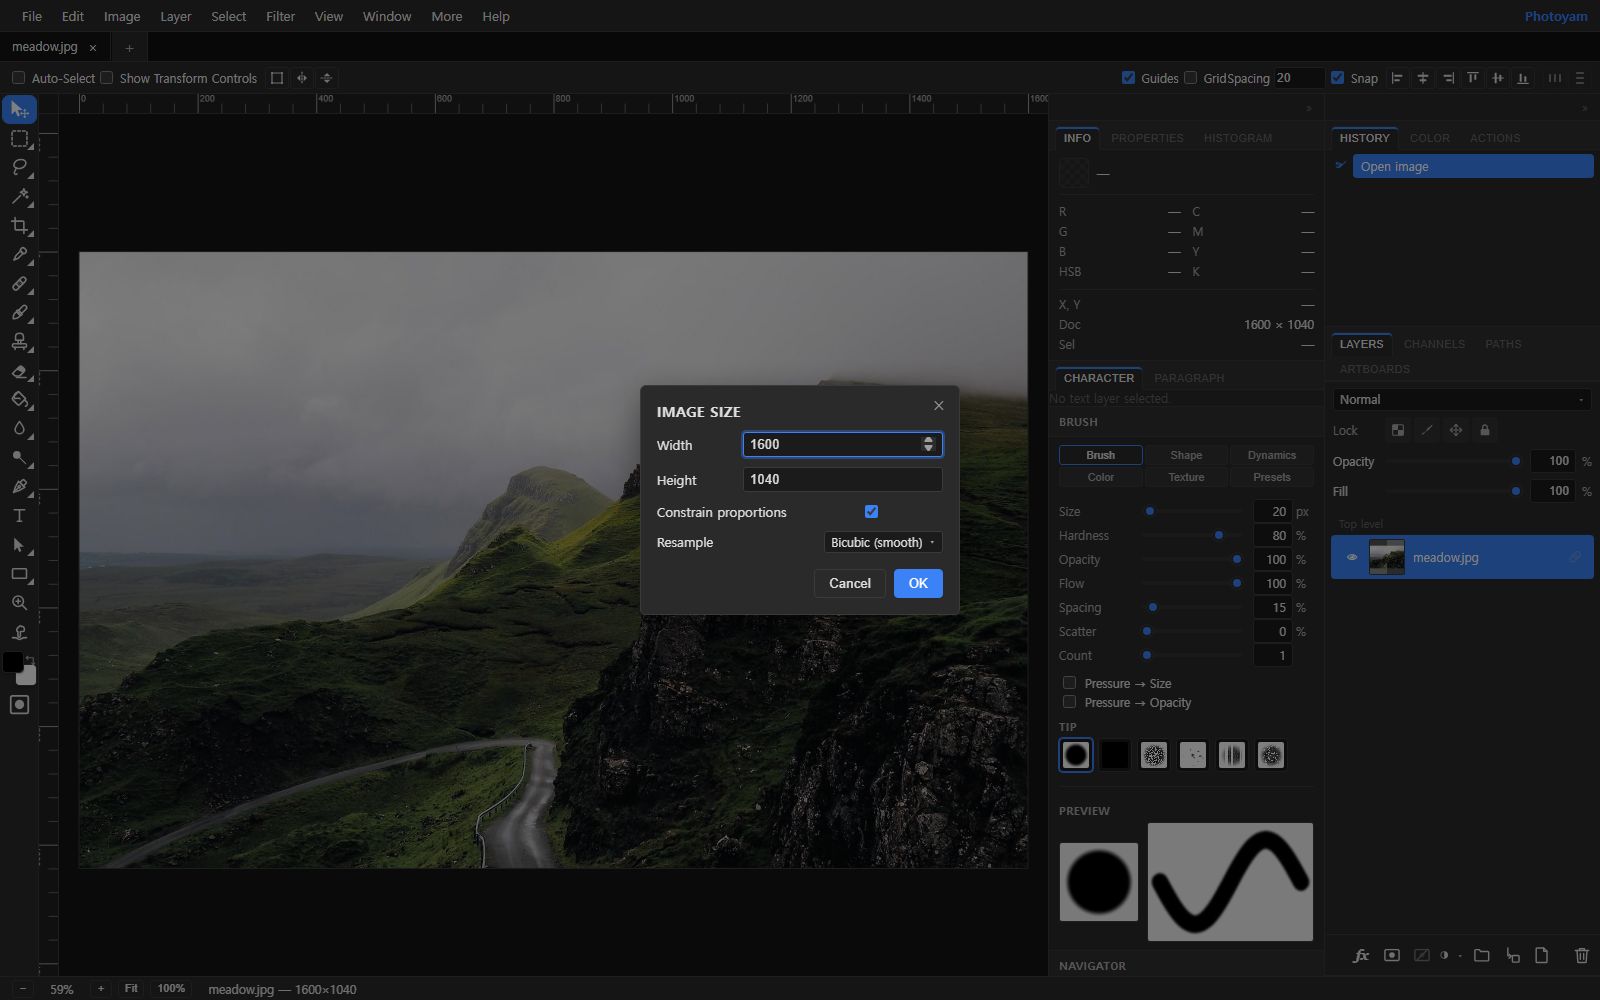
In the Photoyam editor, Image › Image Size… resizes the document with Constrain proportions on by default, and Bicubic (smooth) resampling, which is the right choice for photos.
Finding the quality sweet spot
Quality settings do not scale evenly. From 100 down to about 90, the file shrinks a lot with no visible change. Through the 80s and 70s it keeps shrinking and most photos still look clean. Below that, savings get smaller while artifacts get easier to see. That is why JPEG quality around 75 to 85 is common practice for web photos.
Adjust from there based on the content:
- Busy, textured photos (foliage, gravel, crowds) hide artifacts well and tolerate lower settings.
- Smooth gradients (skies, studio backdrops, skin) show banding and blocks first. Keep quality higher.
- Text, UI and line art show ringing around every edge. Use PNG or lossless WebP instead of lossy.
- Thumbnails are small on screen, so artifacts are hard to see. Lower quality is usually fine.
Also avoid re-compressing a file that is already a JPEG at low quality. Each lossy save adds a new round of damage, so start from the best original you have.
Compress an image in Photoyam
The Compress tool opens your image in the editor with the Save for Web dialog ready. You can also reach it any time from File › Save for Web…. Everything runs in your browser; the image is not uploaded.
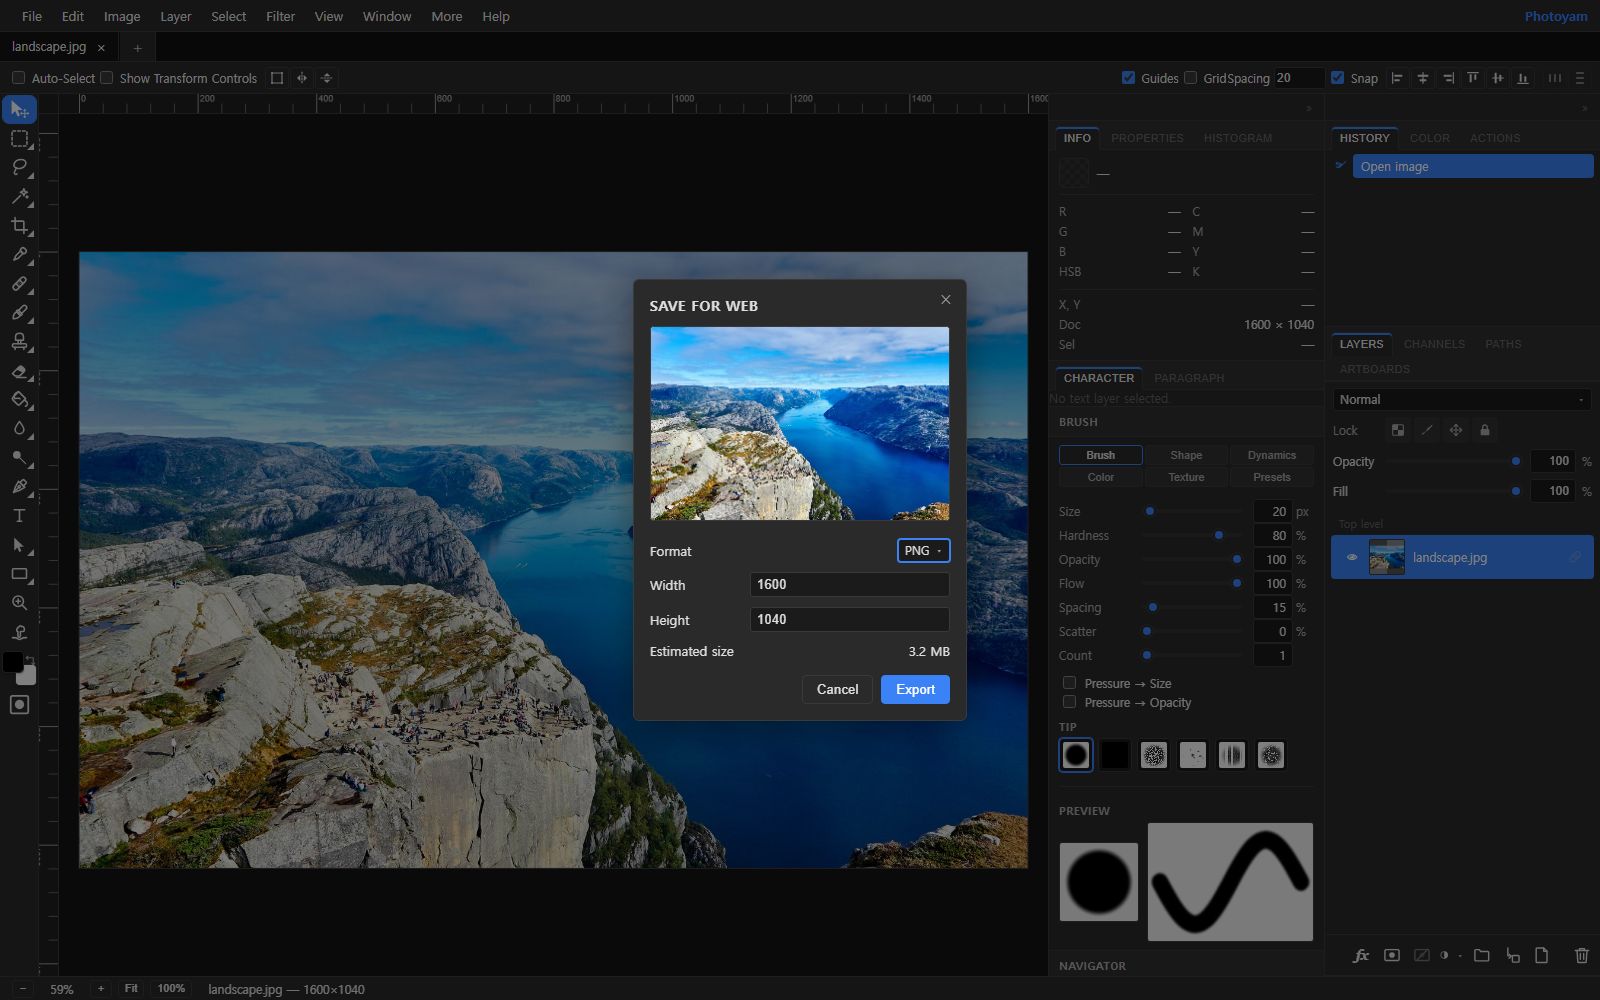
- Open your image. On the Compress page, click Choose an image or drop a file anywhere on the page. The Save for Web dialog opens with a preview and the image’s current size.
- Pick a format. Use the Format menu to choose JPEG or WebP for photos, or PNG for graphics and transparency. The dialog starts on PNG, so for a photo, change it first.
- Set the dimensions. Enter the display size in Width and Height. These two fields are not linked, so calculate the height yourself to keep the proportions (for a 1,600 × 1,040 photo at 1,200 wide, the height is 780). Or resize first with Image Size, which keeps proportions for you.
- Adjust Quality. For JPEG and WebP a Quality slider appears, starting at 90. Drag it down and watch Estimated size: Photoyam re-encodes the image a moment after each change and shows the real resulting size.
- Export. Click Export to download the file. Your open document is not changed, so you can export again at different settings and compare.
For many files at once, use the converter: add the images, set All to JPEG or WebP, choose a Quality, and download everything as a ZIP. The converter does not change dimensions, so it works best on images that are already the right size.
Checking the result at 100%
Artifacts hide when an image is scaled down to fit the screen, because shrinking averages neighboring pixels together. To judge compression honestly, look at the file at 100%, where one image pixel equals one screen pixel.
- Open the exported file in the editor with File › Open….
- Choose View › Actual Pixels (100%), or click 100% in the status bar at the bottom of the window.
- Look where problems appear first: skies and other smooth gradients (banding, blocks), high-contrast edges and text (ringing), and saturated reds and blues (smeared color edges).
- If you see artifacts, export again one step higher in quality. If it looks clean, try one step lower and compare.
Common mistakes
- Compressing before resizing. You spend quality on pixels nobody will see. Resize to the display size first.
- Saving photos as PNG. The file stays huge because lossless compression cannot remove noise.
- Saving screenshots as low-quality JPEG. Text becomes fuzzy with gray halos. Use PNG or lossless WebP.
- Judging on a fit-to-screen view. Downscaling hides artifacts. Check at 100%.
- Overwriting the original. Keep the full-size original; compression is a one-way trip.
- Distorting while resizing. In Save for Web, change Width and Height together in proportion, or use Image Size first.
Quick checklist
| Image type | Format | Starting quality | Check for |
|---|---|---|---|
| Web photo | WebP or JPEG | About 75–85 | Banding in skies, blocks in shadows |
| Portrait or product | WebP or JPEG | About 80–90 | Smearing on skin and smooth backdrops |
| Thumbnail | WebP or JPEG | About 70–80 | Muddy detail at display size |
| Screenshot or diagram | PNG | Lossless | File size; if huge, check for a photo inside |
| Logo or cut-out | PNG or WebP | Lossless or high | Clean transparent edges |
Before any of these: resize to the display size, keep the original, and look at the result at 100% before you publish it.
Try it in Photoyam
Compress a photo with a live estimated-size readout, choose JPEG, WebP or PNG, and set the output dimensions in one dialog. Free, no sign-up, and nothing is uploaded.
FAQ
What quality setting should I use for JPG?
For web photos, a setting in the 75 to 85 range is common practice and usually looks clean. Go higher for images with fine gradients or text, and lower only for thumbnails. Always confirm by viewing the result at 100% zoom, because the number means different things in different apps.
Why is my PNG so large?
PNG is lossless, so it must keep every bit of noise and texture in a photo. That makes photographic PNGs many times larger than a JPG or WebP of the same picture. Use PNG for screenshots, logos and transparent graphics, and JPG or WebP for photos.
Is the estimated size in Save for Web exact?
Photoyam produces the estimate by actually encoding the image with your current format, quality and dimensions, so it closely matches the file you will get. It updates a moment after you stop changing a setting.
Can I compress many images at once?
Yes, with the converter at /convert. Add the files, set All to JPEG or WebP, pick a Quality, and download the results as a ZIP. It does not resize, so reduce oversized images first if file size is the goal.