How to Shrink a GIF’s File Size
A few seconds of animation can easily weigh several megabytes as a GIF, which is too much for many chat apps, email and web pages. This guide explains where those bytes come from, which settings remove the most of them, and shows measured results from one test GIF so you know what to expect before you start.
Why GIFs get so big
GIF is a format from 1987, and it shows. Three of its design choices explain almost every oversized GIF:
- Every frame is a picture. There is no motion prediction as in a video codec. Ten frames of a scene cost roughly ten times one frame, unless large parts of the picture stay exactly the same from frame to frame.
- 256 colors, stored as indexes. Each pixel is a number pointing into a palette of at most 256 colors. A photo has many thousands of colors, so the encoder must pick the best 256 and map each pixel to the nearest one.
- LZW compression. GIF compresses each frame by finding repeated runs of the same palette indexes. Flat areas and simple graphics compress well; noise, grain and fine texture compress badly, because nothing repeats.
Put together: a GIF gets large when it has many pixels, many frames, and pixels that differ from their neighbors and from the previous frame. Every effective setting attacks one of those three things.
The settings that matter, in order
1. Dimensions
Pixel count is the biggest lever because it multiplies every frame. Halving the width and height leaves a quarter of the pixels. If the GIF will be shown at 400 pixels wide, there is no reason to store it at 800.
2. Frame count
Fewer frames means proportionally fewer bytes. Dropping every other frame and doubling the delay of the ones that remain keeps the timing and halves the frame data, at the cost of smoothness. For screen recordings, whole stretches where nothing moves can often be cut.
3. Colors
Fewer palette entries mean smaller indexes and longer runs of the same index. Going from 256 to 64 colors is often barely visible on a busy photo but clearly shrinks the file. Below 32, smooth gradients start to show bands.
4. Lossy
Lossy compression bends the rules of LZW: when a pixel is close enough in color to one that would continue the current run, the encoder uses that instead. The Lossy value, from 0 to 100, sets how far a substitute may be from the real color. Small values are hard to see and often save more than reducing colors.
5. Dither off
Dithering mixes palette colors in a fine pattern to fake the colors that did not fit, which hides banding. That pattern is exactly the kind of noise LZW cannot compress. Turn it off unless gradients look unacceptable without it.
6. Frame optimization
With Optimize frames on, each frame stores only the rectangle that changed since the previous one, pixels inside it that did not change are written as transparent “keep” pixels, and identical consecutive frames are merged into one longer frame. This is a lossless saving and costs nothing to leave on. It helps most with fixed backgrounds, such as screen recordings or a person talking in front of a wall, and does little when the camera moves.
A measured example
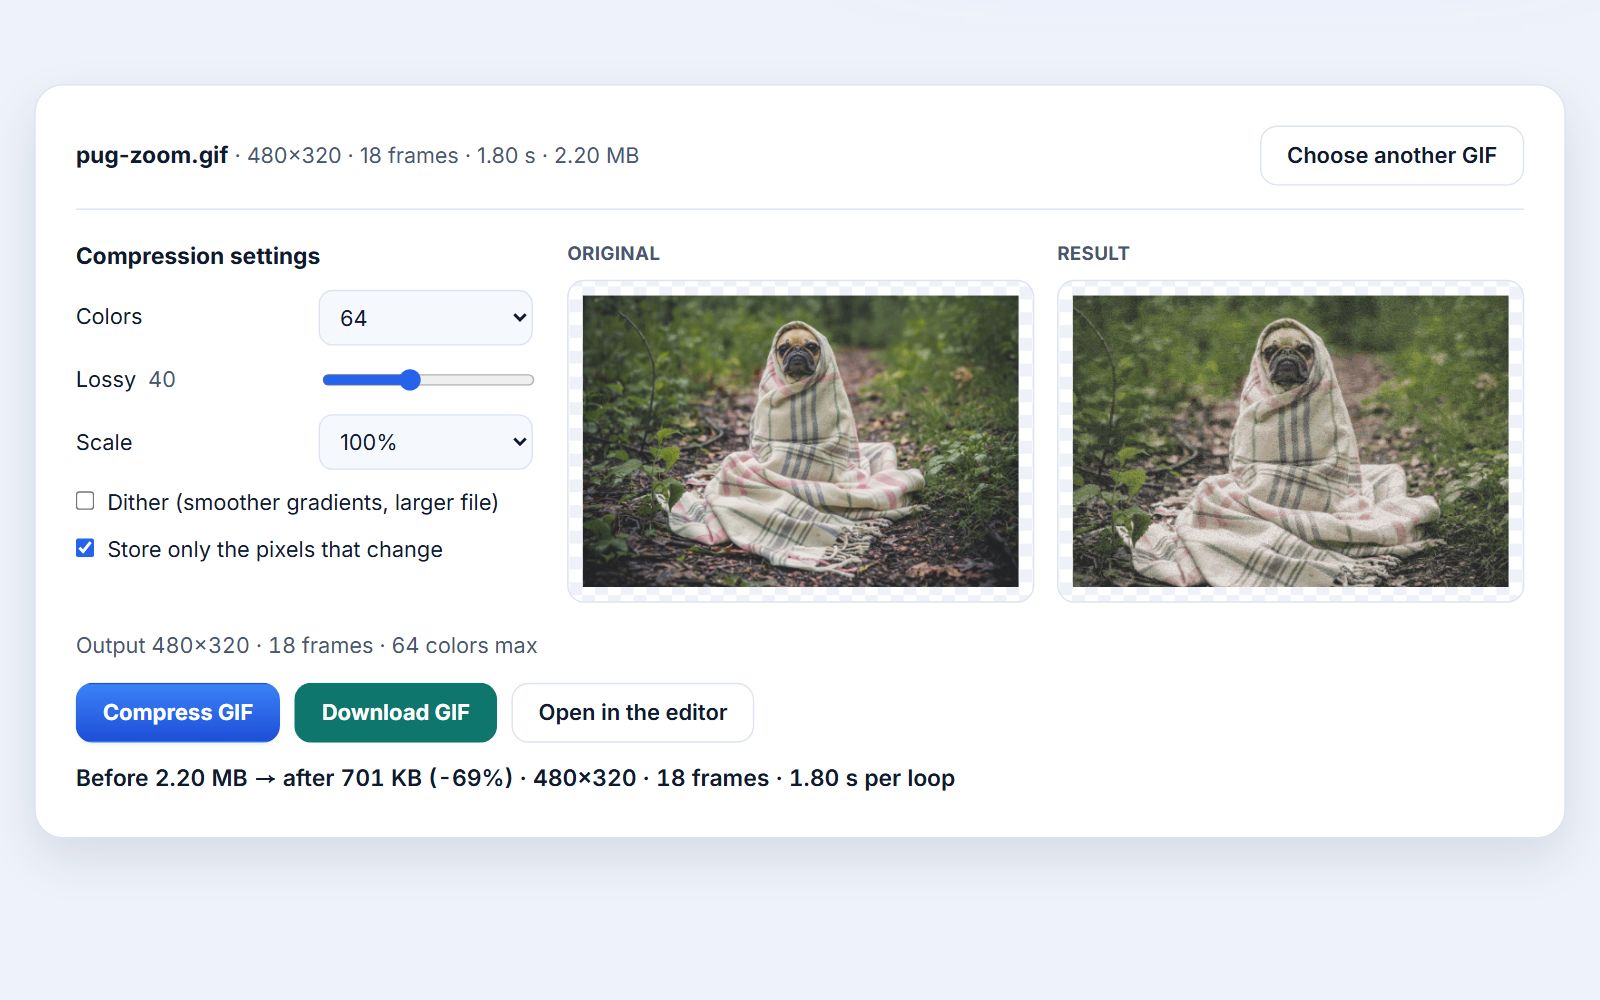
To make these levers concrete, we ran one test GIF through Photoyam’s encoder: a slow zoom on a photo of a dog in a blanket, 480×320 pixels, 18 frames at 0.1 s, 2.20 MB. Because the camera moves, almost every pixel changes in every frame, which makes it a hard case. Your own GIFs will give different numbers, but the order of the levers holds.
| Settings | Size | Change |
|---|---|---|
| Original | 2.20 MB | — |
| 128 colors, no dither | 1,808 KB | about −20% |
| 64 colors, no dither | 1,421 KB | about −37% |
| Every other frame (9 frames at 0.2 s) | 1,122 KB | about −50% |
| 64 colors + Lossy 40 | 701 KB | −69% |
| Half size (240×160), 256 colors | 626 KB | about −72% |
| Half size + 64 colors + Lossy 40 | 209 KB | about −91% |
Two things stand out. Halving the dimensions alone beat every color and lossy setting, and combining a smaller size with fewer colors and some lossy compression took the file from over two megabytes to about 200 KB. Frame optimization made no measurable difference on this clip, because the zoom changes every pixel; on a screen recording it would.
Step by step: compress a GIF in Photoyam
- Open the GIF. Go to the GIF compressor and choose your file or drop it on the page. The header shows its size, frame count, duration and dimensions.
- Pick a scale first. If the GIF is larger than it will be displayed, set Scale to 75% or 50%. As the table shows, this is the most powerful setting.
- Reduce colors. The tool starts at 128. Try 64 for photos and 32 or fewer for flat graphics and screen recordings.
- Add lossy compression. The Lossy slider starts at 30. Move it up in steps and compare the result with the original preview.
- Leave the defaults on the last two. Keep Dither off and Store only the pixels that change on unless you see banding you cannot accept.
- Compress and compare. Click Compress GIF. The result line shows the size before and after and the percentage saved. If the file did not get smaller, the tool says so; lower the settings further or reduce the scale.
- Download. Click Download GIF. The file is saved with
-compressedadded to its name.
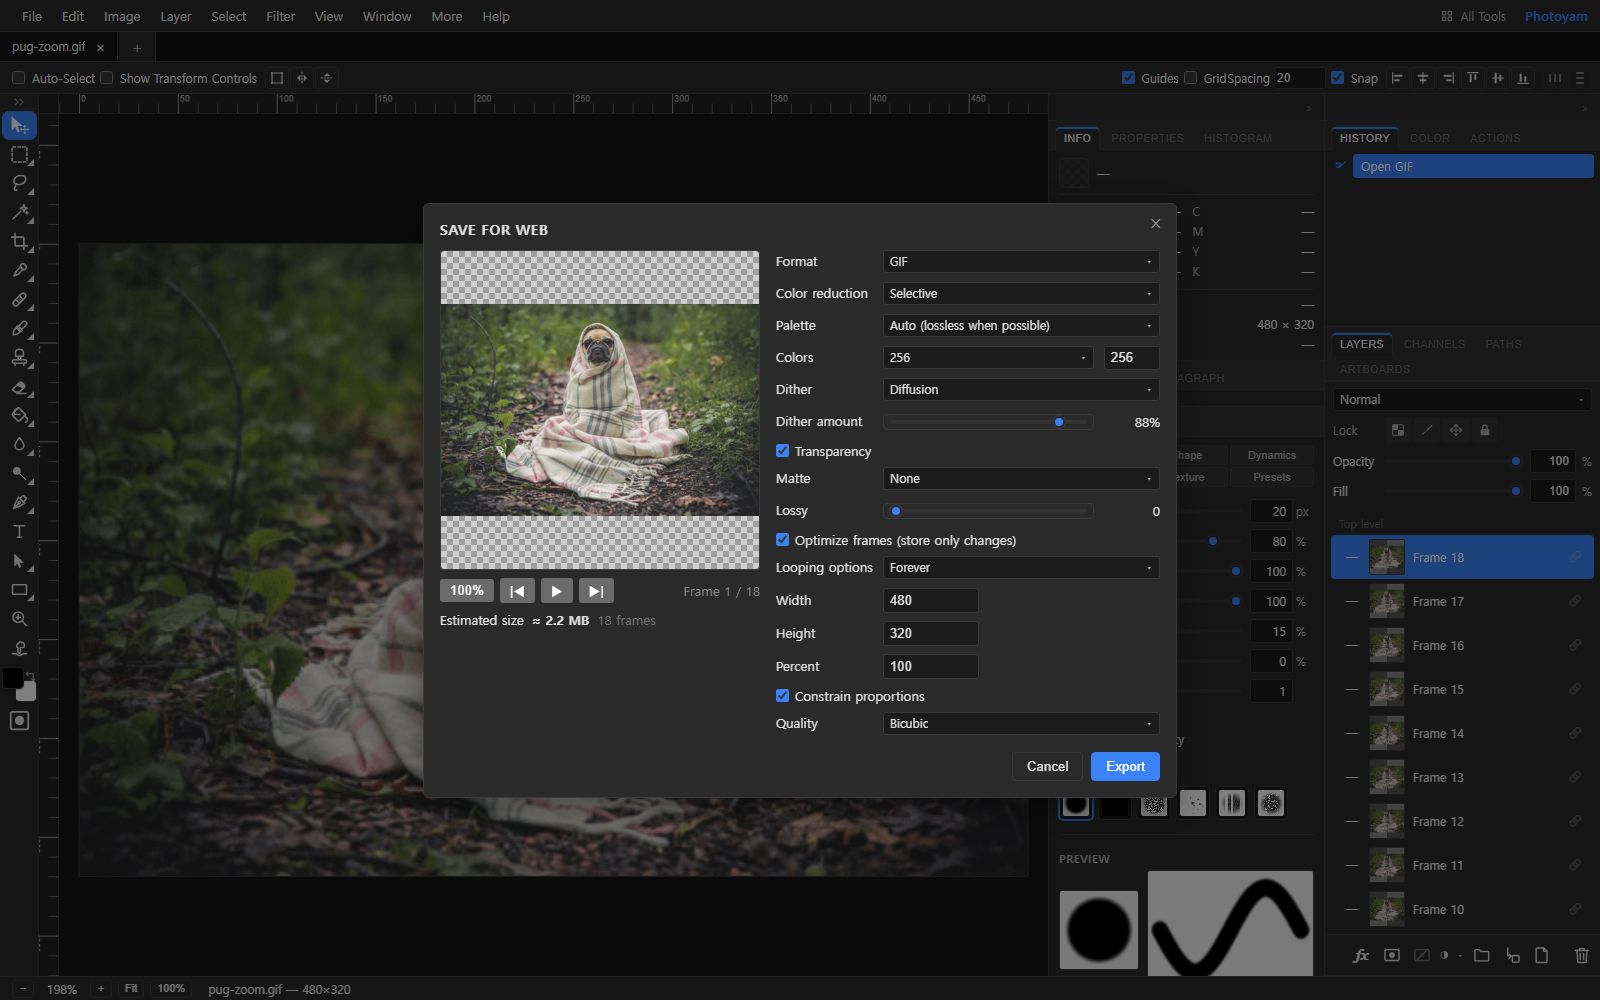
For full control, open the GIF in the editor and use File › Export GIF. Save for Web adds the color reduction method (Perceptual, Selective, Adaptive), the Palette mode, Dither amount, transparency and matte, looping options and exact Width and Height, and shows an Estimated size from a real encode of sampled frames before you export.
When a video is the better answer
If you have tried everything and the GIF is still too big, the format itself is the problem. Video codecs predict motion between frames and do not have the 256-color limit, so the same clip as MP4 is usually far smaller and looks better. Use a GIF where only a GIF works (some email clients, chat apps and documentation tools), and convert to MP4 or WebM wherever video plays.
Common mistakes
- Starting with colors. Reducing colors before dimensions trades visible quality for a fraction of the saving a smaller size gives.
- Leaving dither on for a small file. Dithering adds the noise that compression struggles with. Turn it on only to fix visible bands.
- Compressing the same GIF repeatedly. Each pass loses a little more detail. Go back to the original and choose stronger settings once.
- Judging at the wrong zoom. Check the result at the size it will actually be shown; artifacts that look obvious when enlarged often vanish at normal size.
Try it in Photoyam
Compress a GIF in your browser and see the size before and after. Free, no sign-up, and the file never leaves your device.
FAQ
Why did my compressed GIF come out bigger?
The original was probably already well optimized, or you turned dithering on, which adds noise that compresses poorly. Lower Colors, raise Lossy or reduce the Scale and try again.
What Lossy value should I use?
Start around 30 to 40. Above roughly 60, grain and smeared detail become easy to see on photos. Flat graphics such as screen recordings usually tolerate higher values than photographic GIFs.
Does compressing change the speed or the loop?
No. The compressor keeps every frame's delay and the loop setting of the original. Only the pixels and how they are stored change.
Is there a file size limit?
There is no fixed limit, but every frame is decoded into memory at full size, so very long or very large GIFs can exceed what a phone can handle. A computer copes with far more.